Saturday, 11 October 2014

quilting works in progress...

I have many quilts I want to make, some of them I've been thinking about for a while and others are more recent plannings. I've been playing with fabrics to help solidify what the final quilts might look like.

Here are a few sneek peaks.
This one will be for Little Imp. It will require a bit of precision piecing, and it will be the biggest quilt I've made....maybe that is why I haven't started it yet other than to cut out lots and lots of rectangles.


This one will be our new picnic rug. I am tossing up between going with a half square triangle light/dark pattern, or using instead using a plain dark green plain fabric along with the patterned to make something more along the lines of these half square triangle cushions.


And then this one is the current undertaking. For a new little baby. A log cabin quilt. Fun.


Tuesday, 7 October 2014

Granny's paper pieced quilt

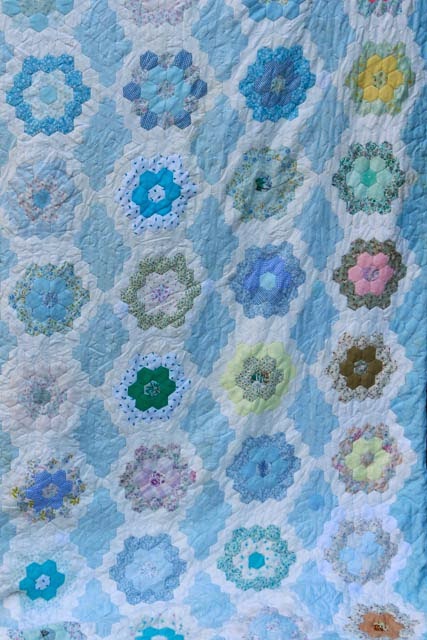
When I was a young girl my granny Harris hand pieced each of her 3 grand daughters a hexagonal patterned quilt. I still have mine today, although it is a bit smaller than it used to be as I cut away a few badly stained rows at one end and re did the binding.


I remember helping her a little. Using old travel brochures as the piecing paper and making piles of the little hexagonal templates granny needed. A bigger template was used to trace around and make the fabric hexagons. I’m sure I barely touched the sides, but I also remember spending time tacking the fabric onto the paper to make fabric hexagon piles for granny to then start stitching together. By hand.


Each hexagon flower with its white border needs 37 individual paper pieced pieces. A quick count of these plus the blue joiners gets me to close to 4500 hexagons!
A Huge Undertaking!


Thank you so much granny for the amazing love you stitched into my quilt. xxx


Sunday, 7 September 2014

Bungle Jungle quilt ... and a chicken!

My first 'comissioned' quilt! For lovers of elephants and the colour red. They decided on a pieced squares and rectangles design and this is how things have progressed. It started with their chosen elephant & floral prints  and I've added in some of the elephants, polka dots and bright coloured prints from some of my stash of Bungle Jungle Moda fabric range. A little larger than what I would usually make for a baby quilt - because this one will be for twins! 

the first finished 'big-square' block

a growing collection of big-square blocks and little-square blocks

playing with the layout of all the completed blocks
But wait, what's this! A Chicken in my Button (sewing) Room??!!
Luckily she didn't make it any further than this as I literally flew across the room to shoo her out. Will have to be a whole lot more careful about shutting the door now that the chickens are free ranging!! (She clucked that the quilt is looking good though!)

Tuesday, 19 August 2014

Kantha Stitching - a sneak peak

A little look at a project that has been in progress for well over a year. I pick it up, I put it down, I come back to it when I'm ready to work on the next installment.

Kantha stitching and a little bit more. A perfect travel or watching TV while stitching kind of a project. Here are some snippets.


Sunday, 17 August 2014

Tiny drawstring bags for Montessori reading materials

It started with a request from OneLittleImps' teacher last term to repair some aprons the kids use, and next I know I have agreed to make little draw string bags in pink and green and blue....

.. agreed to make 36 of the fiddly little suckers! LittleImp goes to a local Montessori school, and these little bags will hold the relevant colour coded levels of reading materials for her class room.

Here is how to make just one bag.

What you need - fabric & ribbon. This bag is pretty tiny - approx 5"x6". Obviously you can upsize the dimensions & still follow the same instructions below.

Cut a rectangle 5.25" x 13" from your chosen fabric.

Mark each end on both edges at two points as shown - at 0.25" and 1.25". These marks are on what will become the inside of the bag.

Fold over the first 0.25" as marked & iron a fold across each short end.

 Fold the bag right sides together, matching up the short edges.

Sewing machine time. Line up your needle with the 1.25" mark and straight stitch using a 1/4" seam down each long edge (to reduce fraying you can either use an edging stitch here as I have, or zig zag down each edge after the straight stitching).

Back to the ironing board. Fold back & iron the top 1" of raw edge as shown


Using a straight stitch sew down each of these side folds. The pictures show how I did this - sew down one side...

...then turn the fabric & turn & sew back up the other side (I also reinforced with a few back & forward stitches at the point where the side seams meet given these little bags will take a bit of use by little fingers).

 This is what it should then look like. Repeat on the other side.

 Back to the ironing board to iron down what will become the casing for the drawstring. Use the 1.25" mark as a guide & fold the edge down to meet this point (or there abouts) & iron the fold.

Repeat on the other side and then straight stitch each of these folded edges down, keeping your stitches close to the fold. Make sure to secure the stitching well at the beginning and end, again to withstand the forces of the drawstring pulling.

Snip all the loose/excess bits of thread. Turn bag right side out & use a sharp-ish object to poke out the corners.

Now for the ribbon. Cut 2x13" lengths of ribbon for each bag. Use a safety pin to then thread one ribbon through both casings. (If the ribbon starts to fray then try folding it over a few times before pinning it with the safety pin.)


Once you have passed through both casings then knot the ends of the ribbon together (as seen on the left side below). Take the next piece of ribbon & thread this through both casings, starting from the other (non-knotted) side, once all the way around join the ends of the ribbon & tie another knot. All done!


 Only 35 to go...


Thursday, 14 August 2014

Shower cap

The last showercap I made sure lasted longer than those flimsy ones you get free in hotel rooms.

I'm not sure that too many people still use showercaps, but if you do, then this is a pretty easy project to complete...not quite so easy to get a shot of someone wearing it at the end though!
OneLittleImp wasn't playing the game to wear it for a photoshoot, so I had to get creative. Thanks Tigger!


Quick How To:

Make a circle template with newspaper, pencil & string - my cap is 19"in diametre. If you want more frilly-ness then use a bigger circle to start with.

Use the template to cut 1 circle from fabric & one circle from a waterproof layer. I bought a cheap plastic table cloth from a $2 store a while back that I use for waterproofing different projects.


Place the waterproof layer and fabric right sides together & straight stitch all the way around the edge with a 1/4" seam, leaving enough opening to turn right side out.

Trim excess & clip seams before turning right side out.

Use your fingers to roll edge flat as much as possible while you top stitch all the way around using a 1/4" seam to hold the fabric & waterproof layers together at the edge. Change the colours of your top/bobbin thread if needed to match the colours of the fabric & waterproof layers.


Fold the circle into quarters & mark each quarter fold at the edge. This will be used to help with the gathering when you add in the elastic.
Use your own head to measure how much elastic you need - Cut this amount with about 1" extra added. Fold the elastic into quarters as well & mark each quarter fold.
Next, pin the start of your elastic (leaving the extra 1" tail that you will overlap at the end) to one of the quarter marks on the shower cap and then match up the next quarter lines on the shower cap & elastic before pinning these points together.

Back to the sewing machine. Change thread colours again if you need to.
Using about a 1/2-3/4" seam allowance, you now sew the elastic to the fabric. To create the gathers, pull the elastic as you sew with a multipoint zigzag to secure. Once you reach the first quarter mark, match up the next quarter of the shower cap & elastic & repeat. This will form your gathers.

Here are the gathers forming. Once you are all the way around you are all done. How simple is that?!?

...And then she finally let me take a picture!