Wednesday, 4 December 2013

Fabric covered baubles

It isn't Christmas without festive baubles now is it!?

Here is one way of making your own fabric covered versions to pretty up the tree.

Gather your supplies:
Polystyrene balls (the ones I used were 50mm)
Coordinating fabric pieces
Matching 5mm ribbon
Scissors
Pencil & felt marker
Sharp knife to cut polystyrene
Butter knife (I used my pocket knife)
Gold stars (ones with the hole in the middle) or bead
Dressmaker pins
Elastic band that fits snugly around polystyrene ball
Template cut out of card (see pic below) – a pointy ended oval shape 9.5cm long & 5cm at the widest point (this will cover 50mm diametre balls)

Using template, mark and cut out 4 pieces of fabric for each ball. Depending on the fabric pattern you may want to position the template to get the part of the print you want. I cut 2 red print and 2 white print for each bauble.

Next you need to mark lines around the circumference of the ball to divide it into quarters. I used the circle on my mathomat to mark the points of the quarters and then slipped an elastic band over along these points to use as a guide to then mark the line. If you don’t have a mathomat you could probably just use 2 elastic bands and judge this bit by eye before marking these lines onto the ball.
 
 Using a sharp knife, cut along the lines you have drawn, about 5mm deep all the way around. Then take the first piece of fabric, place it over one of the quarters of the ball, lining it up so that it will cover all of that quarter when poked into place.

 Use a blunt edge such as a butter knife (or pocket knife tool) to begin to poke the raw edge of the fabric into the cuts in the polystyrene you made before. Starting this at the middle / widest part and working your way towards the point at each end in turn makes it easiest to keep the fabric nice and smooth. If you make a mistake, just pull out a bit and re-poke it in.

 Repeat until you have all 4 pieces of fabric poked into the ball. If you end up with excess bulk/fabric that you can’t poke in then just snip away some of the excess – make sure not to snip too much though!

 
Cover up the raw edges of the fabric using the ribbon. Start at what will be the top of the bauble and run the ribbon around one circumference line.

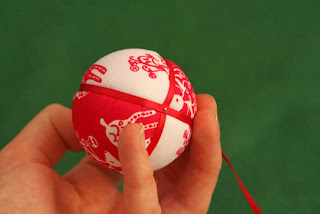
 When you reach the top again, twist the ribbon as shown and then track down the other circumference line – covering up all of the raw edges.


 I found it easier to pin the ribbon once it crossed over at the base, and similarly at the top to hold it in place. Snip the ribbon.


 Take a gold star (or bead) and thread it onto a pin. Tie off some gold thread and then poke the pin through the knot.


 Place this threaded pin into the top of the bauble & voila – now you can hang it on your tree...

 ....or box it up with all the others you will make as gifts!

No comments:

Post a Comment