Showing posts with label create. Show all posts

Sunday, 8 June 2014

Half square triangle cushion cover - Part 1

Half square triangles. Mmmm, every blog I read before I attempted my ‘HST’s’ made it appear these are easy. And perhaps they are…if you have measured perfectly, and cut just so, and sewn your ¼ inch seam with accuracy. But I can speak from experience & say that I for one am not so good at getting all three of those steps to work as well as perhaps they should. And that leads to half square triangles that don’t align perfectly in the corners. And that can be a little frustrating to say the least!
Thankfully I decided to start with a small project – a cushion cover – rather than a whole quilt. 

I wanted to use up some of my 5" charm square stash for these projects, matched to a coordinating plain fabric. Each cover ended up using 12 full charm squares and part of one extra square. I used the technique where you sew all the way around 2 squares with right sides together and then cut 2 diagonal lines to get 4 half square triangle squares.
The turquoise cover was my first attempt & I learnt a lot - even the second half of the turquoise cover has better aligning seams than the first, so I am optimistic that the second cushion cover in purple (using the same pattern) will be much improved technique wise.


There are plenty of blogs stepping through how to cut half square triangles, so I won’t reinvent that wheel. But I am going to jot down some of the key things I didn't find out readily from the net, and instead worked out through trial and error (with a few mutterings under my breath from time to time!!).

Cut 12 x (5 1/8”) squares from coordinating plain fabric (plus make one extra square). My charm squares never seem to be perfectly 5” or perfectly square, so I decided to cut the plain fabric squares at 5 1/8” to give me a bit of breathing space when stitching together. 

Place a charm square on top of a plain fabric square & stitch all the way around. I found it best to start stitching part way down one side (rather than in a corner) to avoid puckering where the stitching meets. And it was worth taking time to get the ¼” spacing accurate at each corner - sometimes I shortened the stitch length towards the corner to help with that.

 Cut from corner to corner to end up with 4 pieces as shown, Ideally these cut lines will be at a 45 degree angle to the sewn straight joining seams. Ideally!
Then open and press each triangle to get the HST squares. 
                                
 The first big mistake I made with the turqoise cushion was deciding not to square up until I had sewn 4 squares together into a 2x2 block. Botheration & bollocks. For the purple cover I squares up the individual squares first & that worked way better. 
I lined up my 45 degree andgle on the ruler with the seam and then trimmed down the first 2 edges (right and top), making sure I still had room to trim when I turned to square up the final two edges (in my case 3 1/8")

Next, spin the square around, line up the angle line again as well as the 3 1/8" size markers on the edge and cut the square to the size you want.

Once all the squares were sewn, squared up and pressed  I decide on the design & took the all important picture.

I guess ideally I would have had an even number of squares but the size of the cushion needing covering dictated a 7x7 square cover. I worked in rows, sewing adjoining squares into pairs. When pressing I made sure to alternate seams either pressed to the left or right. This helped when then sewing up the 2x2 blocks.
This picture shows the pressed seams facing left and right while I sew together. Nestling them at the seam helped to get a good result. I do still wonder though if pressing open would be better with this pattern given you end up with so many seams where all the pieces meet.
Here is the work in progress (from bottom right working to the left). 2x2 completed blocks, adjoining pairs sewn together, adjoining pairs waiting to be sewn together etc.... And the trusty computer screen showing the design so I don't stuff up & have to unpick!!

A bit further along the way of joining squares together...

The final seam. I did find that once I was sewing more than 3/4 squares together in one go that pinning at the seams was definitely worth it to get good alignment.

Da da!

It's interesting that this is almost the same design as the turquoise one, but I like it so much more. Not because of the colours, but the fact the central square has the patterned fabric rather than the solid seems to work so much better.
Now the more tedious task of making them into cushion covers begins....

Saturday, 15 March 2014

Crazy Nine Patch Quilt

Before I left for Cambodia I managed to finish off another baby quilt. Having a deadline helped that along - it needed to get to Melbourne & Husband was headed there just after I returned.


I started off by selecting the 9 fabrics to make up the crazy nine patch squares. The pattern & how to make these can be found at Oh, Fransson!

The end size of the crazy 9-patch blocks was dictated by the fact some of the initial squares were from a layer cake & therefore only 10 x 10 inches. Just having 9 smallish crazy blocks floating on the quilt top didn't look good, so then came all the umming and aahing as I played around with different designs & combinations...until...drum roll...
The plan was that it would look something like this. Kind of.


First up I strip joined rows of 9-patch blocks together like so:
 And so:

...to end up with one big 3x3 crazy block.

I also fussy cut the nine 2.5 x 2.5 inch squares from the animal print fabric that were also going to go on the quilt front. I use a clear plastic template I've made to work out where to cut (the inner line on the template shows where the seam line will end up.

Or line up my quilting ruler using the template on top

I find one of the easiest ways for me to work out which bit of quilt to join together first is to chalk out the edges on my sewing room floor & then place out where I want things & measure in between to work out what sizes I need to cut, and how things will end up piecing together. Here I have the finished big block & am working out the spaces between the fussy cut animal squares, the big square and the quilt edges.

I ended up deciding a pop of purple was needed between the small animal squares, So this is what I did next, strip joining the 2 rows of animals with the purple. Now the floor begins to resemble the rantings of a crazy woman - numbers and symbols scrawled everywhere!


There is method in my madness (for me anyway!) & slowly the other sections of fabric are cut and joined together in order:


The Quilt back.
I had a big strip of the animal print left, so wanted to use as much of that as I could.
A small square managed to use up some more of the turquoise, grey & green scribble (Bungle Jungle) prints and broke up the solid teal green.
The binding I was using was another piece from the lovely gift of a huge bag of scraps I received a few years ago. Not quite big enough to make it all the way around I added in some of the yellow polka dot scraps I had left. This I decided would tie in with the yellow scrap I used on the back of the quit.
Here are the quilt back pieces before they were all joined together:

The quilt sandwich was compiled & then I began to play around with how I might quilt. I liked the notion of random lines, reflecting the 'crazy' lines in the 9-patch squares.

Two things I couldn't find the answer to on the internet.
1. How do you plan the pinning around such a  random quilting plan without having to remove & re pin pins the whole time you quilt?
2. Where do you start so you minimise bunching/puckering? I know it should be working from the middle outwards & I could do a few main lines that fitted that, but then what!?

This was in part my own answer - I lay wool 'lines' out over the quilt in a rough pattern I was happy with & tried to pin around these lines.

And then used painters tape to mark the line before quilting.


It kind of worked - but there was still a whole lot of pin moving...and a bit of unpicking of puckers where some of the quilted lines intersected. Not too much though.
 Quilt sandwich finished & trimmed down, I then added the binding, making sure to position the yellow section in the one corner to match the yellow on the quilt back. I use metal hair clips now to hold the binding in place - you can buy special (expensive) quilting clips, but the ones I bought from the $2 shop seem to do the trick for me!

Hopefully there is enough quilting to hold it all together for the years of use ahead!

Tuesday, 21 January 2014

Clothes pin Dolls...how to make them and their clothes

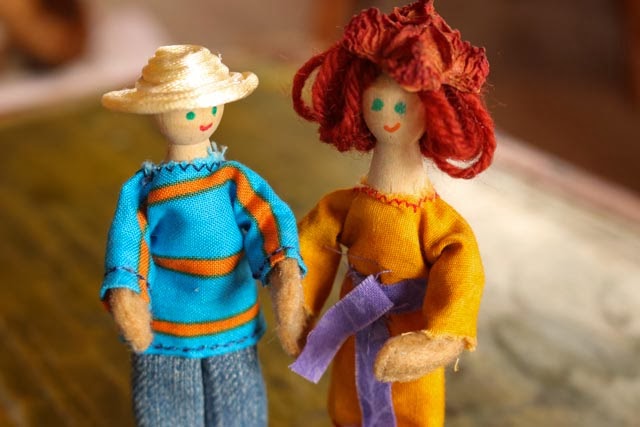
You may have seen the little clothes pin family and their home I created for Christmas, well here is a bit more detail on how to make these little dolls and some things to dress them in.

The initial inspiration for these clothes pin dolls came from a Better Homes and Garden magazine with clothes pin dolly angels, elves and skating girls. I based the skirt and tops on the patterns in the magazine, modified somewhat to create these dollies instead.


What you need

  • Wooden old style clothes pegs or 'clothes pins'
  • Bits of felt, fabric, ribbon, wool
  • Pipe cleaners (chenille sticks)
  • Drill with 2/2.5mm drill bit
  • Fabric glue
  • Pens
  • Paper/card if you want to make clothes patterns
  • Scissors / pinking shears
  • Imagination


All of these dolls have flexible, moveable pipe cleaner arms that are attached through the peg itself. Use the drill to make a small hole all the way through the peg at ‘shoulder’ level. Insert pipe cleaner cut to about 8cm (not yet cut in picture below).  
middle - clothes pin with hole drilled at 'shoulder', right - insert pipe cleaner 'arms'

Embroidered Denim Skirt

Mark and cut out skirt. Using pinking shears for the bottom of the skirt will mean you don’t need to worry about hemming.


Embroider whatever takes your fancy – a few daisy stitch flowers and some running stitch perhaps.

Fold skirt in half, right sides together and either hand or machine stitch a seam down the matching straight edge.

Turn right side out and press seam flat.

Pinch the ‘legs’ of the dolly together to pull the skirt up and onto the doll if you have already inserted the pipe cleaner arms, (I hadn’t in this picture so just pulled it over the head if not). Use a little bit of glue to secure skirt in place once you have it in the right position.


Denim Jeans

This method uses an old pair of jeans, cut so that the original hem is still intact. Each ‘leg’ of the jeans is made separately.
The focal point in these pictures is terrible – sorry!

Cut out 2 rectangles approx. 6cm x 5cm, ideally including the original hem line of the jeans as you can see in this picture.

For each rectangle - Turn over approx. 1 cm at the opposite end to the original hem line and straight stitch (black stitch in photo).

Then fold in half to match up other raw edges and straight stitch again.

Turn right side out & you should have a fabric tube that will become one leg of the jeans.
Slip each ‘leg’ of the jeans on over a separate peg ‘leg’, with the original jean’s hem line at the bottom as shown. You may need to gently prise the peg open a little to get all the fabric to fit but the fact it is snug will help hold the jean in place. Use glue at the ‘waist’ to secure the top of the jeans once you have pulled them up as far as they can go.

Once you pull the top on you won’t notice that the jean legs were made up separately.

Top or dress

 Cut out a cross shape as shown below (pen lines). If you want to make a dress then extend two opposite ends so that they are even longer than drawn.


One step that is worth doing before you go any further is to cut a small hole for the head to fit through and reinforcing this with a tight zig zag or blanket stitch. I did this on the blue and orange top first up and this made it much easier/neater than leaving it until after stitching the side seams.
 
Freestyle from here on in though - you can fold over and make a proper seamed sleevse and bottom of the top before turning inside out and stitching the sleeve and side seams...

 ...or... cut sleeve and bottom edges using pinking shears and don't bother folding over and stitching. You can also machine stitch side seams (above), or hand stitch (below).

 Once all the seams are finished, turn inside out (add a neck hole if you didn't earlier)...

And then 'dress' your doll. Much easier if you do this with the 'arms' pointed upwards.

Add a tie on or stitched on belt if you like.


Felt plaited hair

Cut out a piece of felt as shown – the middle part is slightly smaller than an Australian 5 cent piece, and each ‘strand’ is about  6mm wide and 60mm long. Cut a notch as shown.


Working from each side, plait the 3 strands of felt and then secure well with ribbon.  Make a bit of a fringe by making lots of small cuts in the felt (2mm deep & approx. 1mm apart) around the side opposite to the notch you made.

To attach the hair, glue the back and sides of the doll’s head & then drape the plaits over each side and smooth across the forehead where you created the fringe. I generally found that the small notch shown in the first picture wasn’t big enough, so you may need to cut away additional felt at the back of the head before smoothing this down.


Wool Hair

Wrap wool around two fingers and tie in the middle. The thickness and length of the hair will depend on how wide your fingers are apart, and how many times you wrap the wool around. Glue in place on the head. 

This hair style looks better with a hat, or seed pod beret!

Hands

The easiest way I found to do this was to freeform stitch multiple ‘hands’ as shown – skinny ‘U’ shapes. Each stitched ‘U’ shape is about 5-7mm wide and 30mm deep.


Then cut them out close to the stitching

Have your pipe cleaner arms inserted into the peg & any top/dress already on the doll before you add the hands. Roll up the sleeves a bit to avoid getting glue onto the top/dress. Then pop some glue into the open end of the hand…


…and then insert the pipe cleaner ‘arm’ all the way into the felt hand.  

Carefully roll down the sleeves of the top/dress to hide the raw edge of the felt and the pipe cleaner. And then add the other hand the same way.

Hat


This technique worked really well and has held up even more surprisingly well to playing, prying fingers! Glue around the top of the doll’s head and then a strand of glossy cord wound round and round from the centre of the head outwards to make the top of the hat. Once you reach the forehead level, start attaching each consecutive wind of the cord onto itself to make the brim – gluing along the outer edge of the cord to hold it in place as you go. 
 

Stabilising Stands


My dad made these for me in his wood working pad. A round piece of wood about 25mm diameter and 15mm high with a smaller hole about 12mm diameter and 8mm deep drilled in the middle. A gentle squeeze of the peggy doll legs to insert the dolly and then dolly can stand!

Happy families!