Sunday, 19 August 2012

Freeform machine embroidery


My first attempt at freeform machine embroidery.  

I think I might get hooked!

I chatted with a lady at a recent craft show I went to about this technique & returned with some hints & tips on what to do.  Turns out water soluble stabiliser was the ingredient I had never come across before that can make this all possible.
So, got myself some of the soluble stabiliser last week & had a go.

Essentially with this technique you sandwich fibres (wool/threads etc) in between 2 layers of water soluble stabiliser (which looks like a transparent plasticy type sheet) & then use a sewing machine to freeform stitch all over to hold all the fibres together.  Then you dissolve the stabiliser in water to be left with the finished product.  If you have free form sewn enough then it should all be held together as a new piece of 'fabric'.  If not it will all just fall apart!

Here are my scribbles on the steps I took making the small piece pictured.  All a learning process, so next time I will try a few different ways of doing things...

Place machine embroidery hoop over the top of a single layer of water soluble stabiliser.  Work out & mark with pencil the outline of the area you want to cover.  Then begin filling this in with a fine layer of wool fibres & then begin to add other layers of fibres for texture & colour.  I added cut & unwound different shades of craft wools first:

Then metallic gold & red fibres pulled out of a scrap of fabric (these threads were all probably a bit short to be held really firmly, but given the finished design was to be framed I wasn't too cautious).  Then some longer cut metallic thread & some 'bobbly' wool bits from a ball of novelty type wool.  Finally I added another really fine layer of wool fibres over some of the design to help hold things in place.

These pics show the pre-stitched fibres with a card frame I used to check what it might look like finished
Then carefully lay a second layer of the stabiliser over the top to form the 'sandwich' and secure it all in the embroidery frame.  Now set up to freeform embroidery stitch.  
Things I discovered during the stitching process:  
* Standard cotton thread seemed to snag quite a bit, the proper embroidery thread I bought worked much better, even when I had a standard cotton thread still in the bobbin,  
* A new fine (70/10) needle also helped
* A combination of varigated (multicoloured) thread & single colour threads worked well for me for this design
* I went round the edge to catch all the freeform stitched lines creating a border (but made sure this would be hidden under the card frame as I didn't want this to be seen).  Not sure that this was necessary, but figured it must help to hold everything together.
Front side of the finished stitched stabiliser-fibre-stabiliser sandwich
Finished 'sandwich' held up to the light - gives an idea of how fine the layer of fibres is - still see through

Remove 'sandwich' from the frame, cut away excess stabiliser & place into water to dissolve the stabiliser.  Here's hoping there is enough stitching to hold it all together!  Then allow to dry & frame.

Some close up detail shots of the finished product.


Wednesday, 15 August 2012

Hand stitched farm scene discovery

Mum & dad have recently moved house & in the packing & unpacking a little hand stitched scene I made about 15 years ago was found.  I only have very vague memories of doing it, but it was around the same time I made the hot air balloons scene that has ended up on Little Imp's feature wall.


The calico background was painted with mum's water colours before the scene took shape over the top.


 I stitched over some real paperbark to create texture in the tree trunk and a mix of french knots, chain stitch and straight stitch to create the flowerbed, garden and orchard.


The main part of the house was another layer of calico stitched in place over the background.


Seems I was into texture and stitch even back then...


Saturday, 11 August 2012

Felt Memory Game

A Felt Memory Game...or 'The Game of Same'.

I've seemingly only been watching the Olympics over the past while given the lack of updates, but I have been busy crafting behind the scenes, promise!

A long time ago, shortly after making Little Imp's eye spy quilt, I came across this beautiful felt memory game on the Purl Bee blog.  My idea was that one day I would make a similar felt game but one that could also be used for matching to pictures on her eye spy quilt. Then, about a month ago now, Little Imp suddenly started matching similar things and saying 'Same'.  It seemed that the time had come to do something about making my version - 'The Game of Same'.  Perhaps not quite as pretty as the Purl Bee version, but also much simpler & faster to do.  After all the cutting out, the sewing up was surprisingly fast.


Matching same-same cards to onto the quilt


 Basic How To
Materials needed (enough to make 20 pairs):
  • Felt (I found some felt much stiffer than others, the stiffer felt works better for this project)
  • Medium interfacing
  • Assorted print fabrics - for this project I used left over eye spy quilt scraps
  • Clear home made templates (helpful but not essential)
  • Cutting mat, ruler & rotary cutter


  • Measure & mark 40x  3 inch squares onto the felt & then cut out into pairs using scissors. Given my cutting & measuring skills are not perfect, I found keeping the pairs together to start meant they were matched better when I came to cut & stitch. 
  • Measure & mark 40x  2.5 inch squares onto the interfacing & cut out using scissors into individual squares.
  • Cut assorted print fabrics into 40x  2 inch squares, 2 of each fabric.  This is where a home made 2x2 inch clear plastic templates can be useful. Use them to work out which part or the best part of the design/print you will fit into a 2inch square before cutting.  Although each pair is from the same fabric, for this game I wasn't fussed the picture on each one wasn't exactly the same.  Nothing wrong with a bit of a Game of Same-Same challenge!
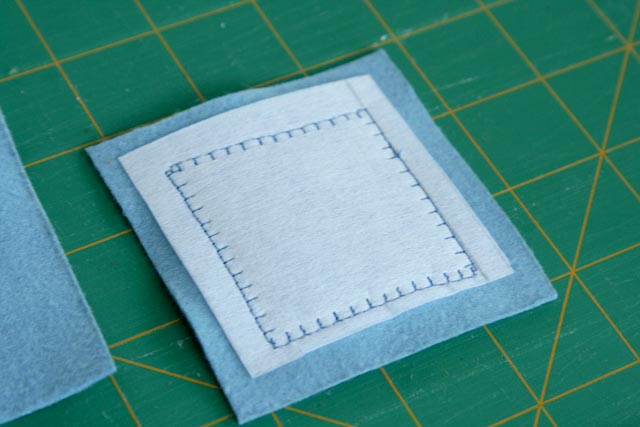
  • To make each single memory 'card' do the following:  Cut a felt pair of squares in half.  Centre a fabric print square on top of one felt square and centre an interfacing square underneath the felt.  

  • Machine stitch around the edge of the print fabric using a blanket stitch, catching the interfacing as you do so.  I didn't bother using pins, as long as the fabric print is centered, the interfacing doesn't have to be perfectly aligned.  Trim any interfacing closer than 1/4 inch from edge of felt.

  •  Place the other square of felt onto the back to cover over the interfacing and align & pin together. 

  • Machine stitch using straight stitch around the outside of the memory card. Trim if needed to neaten.
back & front of cards
  • Then make another card to get your first pair.  Repeat as many times as you like!
  • I also made a matching felt bag (of course!) to store The Game of Same.  Little Imp does like her game & for her age the game of matching cards to her quilt is just perfect!


Saturday, 7 July 2012

Recovering an armchair - Part 2


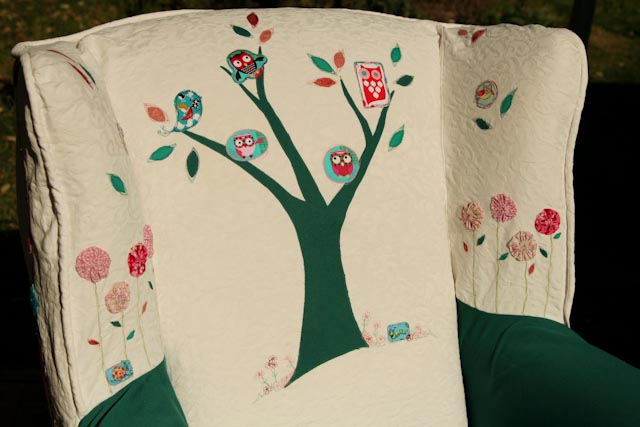
Little Imp's armchair is complete, with little matching pillows.  What fun I've had.  Check back to Recovering an Armchair Part One for the chair used to look like.  I ended up replacing only the bits in green - the front skirt, arm rests and a piece under the main cushion & kept the original white of the old chair cover for the rest.  The embellishing is made up of a combination of free form machine embroidery, Heat-&-Bond iron on adhesive to attach fabric pieces, hand stitching, felt & buttons.

But for now I might just let the pictures do the talking.


Little flowers and bugs hide at the base of the tree under the cushions & Sullfok puff flowers grow on the wings

Fabric embroidered birds on a ribbon wire with bright buttons & flowers


Applique and free form machine embroidery toadstools and flowers on the front skirt

A hand stitched tree & machine embroidered flowers on the armrest 


Felt embroidered circles & fabric owls on ribbon 

A line of elephants


Friday, 6 July 2012

Ikea Hackers expedit drawers

We are finally getting to fitting out our not-so-new-anymore home extension with furniture & adding a few personal touches.  One corner area has become One Little Imp's play corner and an expedit 4x4 storage cube fitted the bill to begin to retain the play things.


But a cube by itself was not enough to tidy up of course.  A few pull out boxes helped contain the big bits and then some expedit drawers were installed to become a pretend oven, or 'doddy's' bed, or anything else that Little Imp thinks up.

The plain white expedit drawers looked boring though.  Not exciting enough for a play corner.  A little inspiration from a website I stumbled across recently Ikea Hackers reminded me that even new things can be changed and embellished....

So a bit of bright fabric and some bright red painted knobs later this is the result:


Little Imp is happy with her new play space, and I'm happy with the fact things have a place to be put away! Now to find the right reading lamp to sit atop the expedit.  Mmmm, ideas.

P.S. Note the nice new chair peeking in there on the left of these pics?  It's the one that has replaced the wingback chair that I finished recovering yesterday!! - just waiting for daylight to take some photos to upload.


Saturday, 16 June 2012

Recovering an armchair - Part 1

We have a beautifully shaped wing back armchair in our reading/ LittleImp's play corner that is in desperate need of being recovered, although the chair itself is sturdy sturdy & will see many years yet.  The white cover  though has seen better days, with stains and tears that can no longer be hidden with strategically placed cushions!


While looking for light fittings the other weekend I popped into a local furniture store and became smitten with the fabric on an particular armchair, an armchair that was also pretty comfy.  'Wasabi' green coloured geometric leaves all over on a cream background.  A quote to recover our armchair in said fabric turned out to be twice the price of buying the armchair in store. Mmmmmm, dilemma.

Decision:  Buy new comfy armchair from the store...Move old wing back armchair into LittleImp's room as a better reading chair than the one she has already....and here is the fun part.....recover the wing back chair!

I say 'fun' because I'm not going to attempt to redo the whole thing myself - that would be far from fun, that would be scary!  My plan is to use some of the existing cover that still has life in it and add and embellish to my heart's content to make a fun chair for a little girl's room.

I'm replacing the armrest sections and the cushion cover, so ripped them out & apart & used them as templates to cut the deep aqua green canvas I had bought as the replacement fabric.  Next I made up the box cushion cover with a zip in the back.  I winged the making of cushion cover a bit, but also found this tutorial by Design Sponge quite useful.   Then I couldn't help myself & decided to start on the 'embellishment' plan.  The tree is just the beginning....

And then came the owls and leaves, and plans for flowers and much much more!
I'm having fun!!

Sunday, 27 May 2012

Another Frame for Little Imp


There has been a long delay since I last worked on filling the final picture frames for Little Imp's feature wall.  The latest idea for one of these was thought up after last week's sewing lesson with Trish where we discussed using Kantha stitches to create patterns and designs in fabric.  I'd never heard of Kantha before, but now know that Kantha stitch is 'simply' running stitch that is used in different arrangements to make patterns on the fabric.  I will not try to pass off what I have done as anything as beautiful or delicate as what you will find if you do a search on traditional Kantha stitch, but this is my version.  My rows of running stitch 'paste' strips of material, some new, some scraps & one piece of vintage sequined something onto a piece of calico.  Some of the rows of blue stitching I used to add sequins & beads as well.