Wednesday, 28 August 2013

Bungle Jungle Quilt - The finale!

The finished quilted quilt!
Front and Back.


My machine handles straight line quilting very well, without any special presser foot - I just adjust the settings slightly - and so I'm a bit hesitant to try anything else...maybe next time!

And now some close ups for good measure...(after a VERY long IT support call this afternoon I can now finally upload photos from my camera to my new computer - DON'T get me started on Windows 8 - needless to say, I do not like!).
So here they are...


 Just a quick few shots of the quilting and binding process:


That's Little Imp's foot there - busy making her own blue polka dot quilt for her toy animals. She has also tested the planned 'game of same' that I will eventually make to use with the quilt - but figure I have a while before the baby will be up to matching and memory games!

Right, now onto the next project:)


Bungle Jungle Quilt outline
Red and Grey Block
Green and Navy Block
Aqua and Navy Block
Red and Yellow Block
Bungle Jungle Quilt Back

Friday, 23 August 2013

Bungle Jungle Quilt - the back

Here's the back of the Bungle Jungle Floating Blocks quilt:


The design of the back was in part driven by the realisation that I had underestimated the amount of dark grey background fabric I might need and the discovery I had a piece of perfectly bright yellow drill that could make up the difference I needed.  Excellent! This worked in well with my decision in ordering some more of the yellow polkadot fabric to use as the binding. I did look in the fabric stores here, but there really was nothing that worked, so American on line fabric purchase it had to be:(

I wanted to use the whole 10x10 inch square of the large animal print on the back, so decided to 'frame' & highlight this & then used off cuts - different shaped rectangles to break up the rest of the yellow. Something like this:


I added a yellow strip to each side of the off cuts:

Framed the large print square in dark grey, and then added yellow to the width I was after:

And then began adding solid yellow strips inbetween to make up the full length I needed. As usual, I underestimated how much I would lose in seams and ended up having to add in another few coloured rectangle to make up the full length I needed.

 Finally, once all the pieces were stitched together, I squared up the edges and stitched each long edge to a piece of grey. Done!


Then my least favourite bit...the quilting sandwich...


Wednesday, 14 August 2013

Bungle Jungle Quilt - piecing the top

A bit of maths required for this next step. "Measure 6 times, cut once". Allow yourself extra fabric allowance & it will be even less likley that you will need to cut more than once...

Once finished, one of my favorite bits - hanging this type of quilt & looking into the stained-glass-quilt-window.


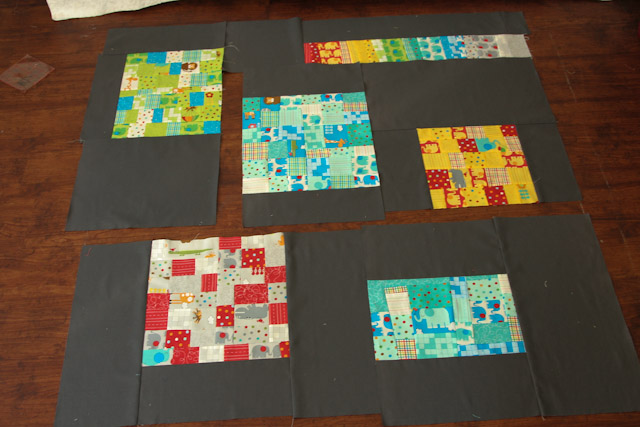
I played around for a long while with the layout, moving the finished blocks back and forth... but ended up with pretty much what I had mapped out on paper all those months ago. Then I worked out where the my dividing lines would go to make up the big blocks - it worked out that there would be 6 big blocks - worked out all the measurements on paper, allowing a good couple of inches leeway all around and then measured (6 times!) & cut out all the pieces of background grey fabric.

Given how large the blocks are I did find pinning worked well at times to make sure they remained aligned when sewing pieces together.

Here are the finished 6 blocks, with an idea how I then combined some of these together in the next round of sewing seams to get 3 blocks. 


Here is the measured & trimmed down view of the next stage - the big top & bottom rectangle blocks finished & ready to sew together.

Da da!


Thursday, 8 August 2013

Hoggie the Hedgehog


Isn't he cute?!

This is not an original - it is from this website. Very quick to piece together. I think my friend who is a bit of a hedgehog fanatic will be appreciative of this little toy for her baby when it arrives early next year.

I think my Hoggie's prickles are a bit denser than the pattern as I ended up cutting another long row of prickle fleece. Perfect for little baby fingers to grab and explore.  I also added a little jingle bell inside the stuffing for extra sensory fun!


Tuesday, 16 July 2013

Bungle Jungle Quilt - Red and Yellow Block

All there is for the Red and Yellow block is a finished shot - I was short on time and just wanted to whip this one out, so no pictures along the way.


I used the same technique for this block as for the Green and Navy Block - strips rather than blocks.

It is all beginning to come together....I just hope the finished product is going to work after the mistake I may have made....

I went searching for the background fabric last weekend, and really wasn't finding anything I liked. I had in my head that a charcoalish grey would work, but none of the greys were dark enough from the quilting cotton section. And then I found what I thought was a perfect grey in the Broadcloth section, so after a bit more umming and ahhing that is what I bought. It wasn't until I checked the receipt on my way out that I realised I had gone and bought cotton drill! Ooops. Wasn't sure if drill was acceptable for a quilt - & an internet search didn't really help. But I figure quilts in the past were made with whatever people cold find, & surely that meant fabrics would have been different weights at times?

The drill definitely is a bit heavier than the quilting fabric, and one side of has a definite diagonal weave, so if the fabric is cut and then re-oriented 90 degrees you can notice a different sheen (see pic), but the flip side doesn't have this weave line, so I think it will be ok if I make sure that is the 'right' side throughout. The plan for the finished quilt is to have a reasonable amount of quilting too, so I think any difference in fabric weight shouldn't matter once I've quilted it all together. Here's hoping anyway!
cut out background fabric - different sheen noticeable dependent on fabric orientation


Bungle Jungle Quilt outline
Red and Grey Block
Green and Navy Block
Aqua and Navy Block

Saturday, 13 July 2013

Bungle Jungle Quilt - Aqua & Navy Blocks

There will be 2 blocks from the aqua & navy print fabrics, one big & one smaller rectangle.

The larger Aqua & Navy block is essentially made the same way I put together the Red & Grey Block.

After cutting strips from the selected prints - an assortment of aqua, navy & some white prints for contrast  - I joined these into groups of 3 strips sewn down the long edge:    


... I then randomly cut each of these into 3 or 4 strips of different widths:

..and joined these together into mini 3x3 blocks:
Some of the mini blocks needed an extra row to increase their size so that I would end up with a block as big as I wanted, so that was added where needed...
 ...and then I joined these 'mini blocks' into one big block:


 And then squared it up (or 'rectangled' it up in this instance) to finish:


I also made a smaller rectangle aqua & navy block using some of the left over strips, as well as some longer pieces of the same fabrics:

Bungle Jungle Quilt outline
Red and Grey Block
Green and Navy Block
Red and Yellow Block

Felt Weekly Activity or Routine Planner

Little Imp often asks in the morning, 'where am I going today'. Fair question given she spends her week days between mother-in-law, Daycare, Nanny or home with mum or dad, and then quite frequently we head away for the weekend to my parent's house.

I saw an in for creating a felt 'weekly activity planner'. Something Little Imp could use herself to look at and know the plan for the day.


My idea was 2 inch felt squares as a base, embellished with different symbols to represent the many places Little Imp might go in a week, as well as some of the more frequent activities she's involved in..  I wasn't sure initially if I would attach magnets to these and set the planner up on the fridge, or make a felt board to place in her room.

Here are some of the finished squares. Little Imp helped work out what some of the symbols should be and "assisted" with the gluing. The symbols ended up being made out of a combination of felt, glitter shapes, colored craft foam, scrap booking cut outs and fabric.
 

We live at number 7 - so these are for days at home

The days of the week were machine stitched onto felt.


I did try the magnet idea, but decided against it for a few reasons, so in the end I just cut a rectangle of felt for the backing, turned over about 5cm along the top edge and hand stitched this down. This created a space to thread a heavy piece of card into. I then clipped 2 holes along the top fold & inserted a small bulldog clip to clasp the card & create a loop for hanging.on the back of Little Imp's bedroom door.

After a few week's of use the only addition we've made is to add an arrow that we can move to point to which day 'today' actually is. The concept of today/tomorrow/yesterday is still a bit confusing to a Little Imp!