Sunday, 24 May 2015

Pyjamas for dolly please

Little Imp does not often ask me to make her anything in the ButtonRoom, but the other night, just before her bedtime she did. "Do you think you could make dolly some pyjamas mummy?"

Oh dear. I have been thinking for a while that dolly could do with some new attire. All she came dressed in is definitely from a summer range, and I feel cold just looking at her at the moment! But she is quite small, and plastic, and not very bendy, so I was scared of how I could make something that Little Imp could also get on and off of dolly without needing my help.

And then I had an idea... I keep many of Little Imp's old clothes for cutting up and sewing with & this was a perfect reason to use them. Once I got going it was actually fun, and before I knew it, not only did dolly have some pyjamas, she also had some cords & a skirt!

The PJs came from a sleeping bag. A sleeve became the pants, with the sleeve cuff as the waist band and a triangular seam creating the legs. Pinking shears worked to eliminate the need for sewing seams. THe top was made out of the base area of the bag. I pinking sheared a circle for the neck & stitched a few seams to create the shape of a long sleeve top. Done, & stretchy enough for Little Imp not to need me!


To make the corduroy pants I cut a square from the top of a pair of pants, including the elastic. Dolly is lying here to help me gauge the length.


A few simple straight lines of sewing along the open edge to create a tube, and then along the purple lines you can (just) see below to create the legs.
 And then pinking shears again for the base of the pants.

The skirt was even simpler. Cut out from the top of an existing elastic waistbanded skirt with a single seam to create a tube. Pinking Sheared bottom. Done.

Saved this picture for last. Dollys scare me. Even when they are in their pyjamas.

Saturday, 9 May 2015

Angel Wings

I made Little Imp some angel wings. Pity I can't make her behave like one too...
She did enjoy herself running around Kings Park with friends this afternoon while wearing her wings. Almost angelic.

How To:

I traced a paper template from a friend's set of angel wings. You could make any shape though really.

Use this template to cut 2 (one reversed) wing shapes out of some stiffish felt (or thin wadding or interfacing). This will provide a bit of shape for the wings. The fabric I used for the wings was a big offcut of dusty pink upholstery fabric (the white below is the water resistant 'wrong side' of this fabric). Double over the wing fabric, right sides together. Pin so the fabric doesn't shift and then place each piece of felt onto the fabric. Mark the outline of the wing about 3-5mm bigger than the felt itself and then cut out.

Assemble a 'wing sandwich' for each wing: fabric-felt-fabric. The fabric should be facing right side out as you can see below. Pin all the way around to hold the 3 layers together.


Then stitch all the way around the outside of the wing to hold all 3 layers together (with the felt hidden inside). I have a blanket type stitch on my machine that I used to finish the edges at the same time.

 Add some straight line stitching for a bit more stiffness and definition.

Add elastic for attaching to the body.  I used about 24" of elastic. Take each end of the elastic and bring into the centre and stitch to hold (so you end up with 2 loops as seen below).

I should have attached the elastic to the back of one of the wings at this point so that the rectangle stitching you can see on the wings I made was hidden. But I didn't - so the pictures show what I did do.
2 wings pinned together

stitch oval shape around centre of wings to hold them together
Add elastic (as I said above - should do this before stitching wings together),
add elastic (should do this before stitching wings together ideally)
and then also cut a small rectangle of wing fabric and stitch over the elastic where it attaches to the wings to make it look a bit neater.
back of wings

front of wings (with the rectangle stitching visible unfortunately) 


Thursday, 30 April 2015

T shirt dress upcycle

Little imp was given a hand-me-down dress that she has worn until it tore on the bodice. She loved it so much I wondered if I could use the skirt part to make into a new favourite. This is how it turned out.

This is the first edition, taken apart at the seam.

I found a long sleeve top that would become the new top half of the dress, perfect for winter. I used the original to roughly gauge where to cut the new top - making the bodice a few inches longer this time given Little Imp has grown somewhat.

Somewhere online I saw this trick - add a piece of iron on interfacing just above where you will cut the bodice - this will help the tshirt material keep its shape once the skirt is added. Given the skirt I am adding is quite heavy I thought this would be worth doing. **Note- I later ripped the interfacing out as I had used waistband interfacing that was way too heavy & so you could see a solid, stiff band through the t-shirt fabric.
interfacing ironed on just above the line where I will cut the shirt

cutting the shirt at the line just below the interfacing (photo upside down)

With right sides together I pinned the skirt to the shirt bodice - you can see the interfacing in the picture below. Then I stitched this together using a sewing machine.

 This is what it looked like turned right side out with a heart applique (from another well loved top!)


A bit too hot to wear it today....

But this day was the perfect day to wear it:)


Tuesday, 28 April 2015

Ashbury Peasant Top and another hairclip

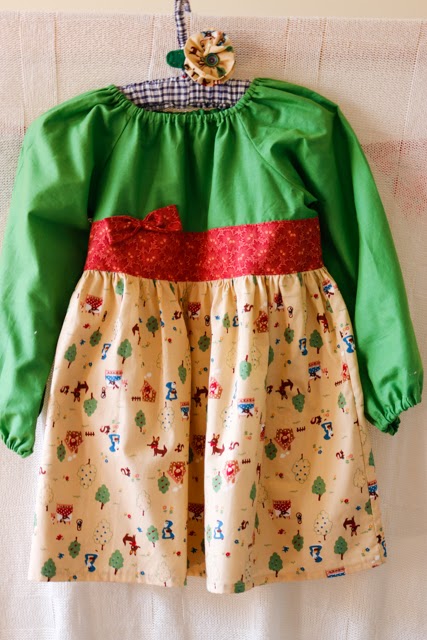
I made one of these for Little Imp a few years ago and she has had so much wear out of it. It is an online pattern Ashbury Peasant Top that is super easy to make - no buttons or zips - and pretty forgiving.

I used a lightweight cotton for the first version & it is perfect for summer (saves the need to go through the battle of applying suncream to arms), or when it is a bit cooler with a layer underneath.

I have used the size 8 bodice sizing for the one I have just made, and the size 6 arms. Probably could have done a size 6 throughout, but too late now! Little Imp likes it, so that is the main thing.


Can't have a new dress without a matching hairclip & this is a super easy method.


Cut a strip of fabric about 16" x 2". Turn over short raw edges 1/4" wrong sides together and iron. Then fold in half lengthways and iron, wrong sides together. I then used pinking shears to trim the tiniest amount off the long raw edges to stop fraying. Set machine to the longest straight stitch length and then sew close to the raw edges to form a long tube. Pull up thread to begin to gather. Keep going with the gathering & the fabric strip/tube will start to twist. Once it is all gathered up work with the twist to sort of roll it up into a flower shape. Secure with some hand sewing and add a button in the middle to hide the messy bits. Attach to a clip - hey presto!

Friday, 24 April 2015

A late Easter post

Look what we made for Easter decorations. I blew all of those eggs. Hard work.


Guess it is still easier than laying the eggs though...Thank you chickens...

Sunday, 29 March 2015

Kids Pyjama Pants

What a super easy pattern!


Kids pj pants from this book - The Liberty Book of Simple Sewing by Lucinda Ganderton. Instead of needing front & back leg pieces, you cut each leg as a whole & essentially make 2 leg tubes that you sew together & then add a waistband. Easy peasy.


The pattern called for basting most seams first - I went straight ahead sewing without basting and it worked out fine. I adjusted the length of the cuffs in the given pattern & could have gone even shorter, but guess that means there may be room for growing into.


Someone likes them a lot - she wore them all night...and day!


Monday, 2 March 2015

Little Imp in the Button Room - an Owl Softie is created

My lovely sister in law gifted me a Sew Cute to Cuddle book by Mariska Vos-Bolman this weekend and Little Imp was taken very much by 'Wooksy the Owl'. By the time we got home she was determined to get going on the 'Whooskie' project.


I really wasn't sure how long the enthusiasm would last, but I provided some sheets of tracing paper and she started tracing the shapes from the back of the book, a few bull dog clips helped keep the paper still for little hands. Before dinner she had traced & cut out most of the pieces we needed. A few wobbly lines and cuts here and there, but on the whole Whooskie looked good on paper!


The first call the following morning was to "keep going with Whoosky". I traced around each of her template pieces & little Imp cut out most of the fabric herself


I restrained myself and let the jagged cutting go for the most part, but again she did such a great job anyway. Here is Whoosky ready for stitching.

I did all the sewing this time around, Little Imp sat on my lap with the roles of snipping, pressing the right buttons and helping with thread selection and threading. We had fun!

I did do the feet - I free formed stitched directly onto the traced lines, then Little Imp cut around the stitching before I turned right side out & stiffed those tricky little claws.

A bit of wing stuffing happening here.

I generally attach softie limbs/appendages with a quick straight stitch to one side of the body before stitching front & back body pieces together - I find this makes sure they get stitched in in the right spot.

A bit of graffiti on Whooskie's bottom so that there can be no mistaking who owns the Owl.

Love at first sight! There was a period of reassurance required as I covered up all of Whooskie's front body with the right side of the back of the body to sew front & back together & Little Imp had to wait for me to turn Whooskie right side out. "Don't cover up Whooskie mummy, you can't put her feet inside her body! Don't!"