Friday, 14 October 2011

A long time between posts...

Time for hand craft has been limited lately.  Having an extension built, doing some renovating ourselves and working almost full time in the last few months doesn't leave much time for anything else.  But we are almost there.  Weeks of reheated dinners eaten on our laps in our bedroom, the only real safe haven from the dust are behind us and it is has definitely all been worth it.  Not only do we have a larger, light filled living area, but I now have a room just for all my craftiness!  I'll share that another time, but going back a few months now before the renovating began in earnest and we still had a couch to sit on I made my brother's little one a felt gift.

The inspiration for this came from two sources. One - my brother who is an amazing artist and drew a tree titled 'Grow' while waiting for his baby to arrive, and two - a book of Softies a hootchie gave me that had a tree softie (as well as a poo softie!).  This is my version for my little niece.


The Basic Gist

2 bits of orange felt for the tree top, with cut out felt circles/swirls, bird and heart hand sewn on with embroidery floss (given felt doesn't have a 'wrong' and 'right' side, beware the rookie mistake of sewing these embellishments onto both 'front' sides of the tree - doesn't work when you go to sew the pieces together!! A few 'bugger, bugger bugger's may have been muttered). Once you have added the swirls etc, machine sew the tree tops wrong sides together with blanket stitch, leaving a gap for squishing in some stuffing.

Cut out the felt tree trunk with the base of the trunk on the fold. Hand embroider a face on one side. Fold right sides together and stitch each side seam. Turn right side out and stuff.Insert the trunk into the tree top, adding a bit more stuffing if you need to and then complete the blanket stitches by hand to attach the tree top to trunk.


Wednesday, 10 August 2011

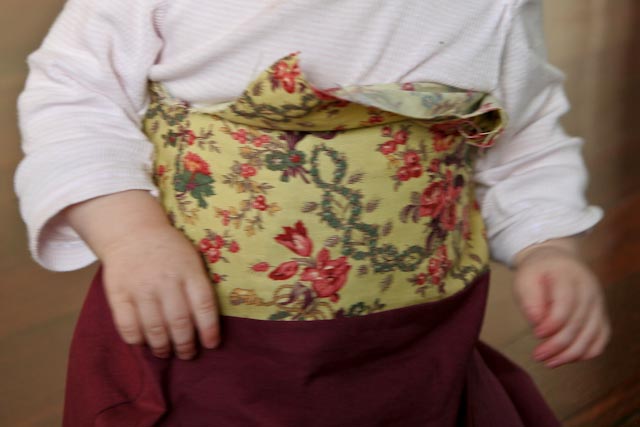
My take on the traditional 'pillowcase' dress

After the first disaster of a tad-too-tight pillowcase dress design I decided to go it alone & make my own.  This is what I came up with, with a little help from Ergonomics-bollocks Hootchie.


Tutorial
First cut out a template pattern for the 3 pieces you need – a rectangle for the dress bottom & dress bodice and a facing piece for the arm holes.  To cut the arm hole I measured 3 inches across & down from one corner & drew a rough arc joining these points.
Bodice - 7.5x9 inches Bottom- 9.5x9 inches & facing

The facing pattern piece is made using the dress bodice arm cut out as a guide.

Then cut 2 each of the bottom & bodice pieces for the dress front & back in coordinating fabrics.


Cut 2 pieces of the facing in the same fabric as the bodice piece, placing one edge of the facing template on the fabric fold.

Pin front bottom & bodice fabrics together right sides facing & straight stitch along edge. Finish seam using a zigzag stitch or cut with pinking shears.  Repeat to make the back of the dress.  Pin front & back pieces of dress together, right sides facing & stitch together at sides, taking care to match up points at the side of the dress where the different fabrics meet.


Now, all of the other instructions I found for making this type of dress spoke of using bias binding to add support to the arm holes.  I don't have bias binding & didn't want to go out to get any, so I phoned the sewing guru, Ergonomics-bollocks Hootchie for an alternative plan, & this is what she told me.

I had to adapt her oh-so-clever plan a little bit to fit the gathered design of the dress I had in mind, but essentially it is the same.

So, after cutting and opening out each facing piece, finish the lower edge with a small zig zag stitch.  Then pin each facing piece to dress, right sides together, matching the centre point of the facing to the side seam of the dress.  Straight stitch in place along top edge.


Open out dress and iron seam flat. Then turn facing to inside & iron along seam. Secure facing to inside of dress with a few hand sewn stitches at the underarm seam.


Make a 'tube' for the ribbon at the top of the dress by turning over 0.5cm, press, then turn over another 1.5cm, press and then stitch close to the lower edge.
                                          

Finish hem of dress in the same way as by turning over 0.5cm, press.  Turn over another 1.5cm & press again.  Straight stitch. 


Use a safety pin to thread your chosen ribbon through the front and back tubes of the dress, either using one long ribbon so you end up tying over one shoulder only, or a separate ribbon for front & back.  Gather up the dress fabric.  

Try the dress on for size & secure the ribbon with a few stitches in at least one or two spots once you have worked out the length you need (to make sure they don't come out in the wash).  
Essentially that is it if you are happy with a basic pillowcase type dress.  But I found the dress a little tent-like, so decided to add a few more touches.

I measured approx 6 inches from either front side seam, folded the fabric under 1 inch and secured these 'tucks' in place with a few stitches.


You could leave the back of the dress as is, use the same 'tuck' method as you did on the front, or make a single gather by pulling together fabric from either end and securing together:


To finish this dress I made 3 coordinating Suffolk puffs and hand stitched in place.  All done!


Monday, 8 August 2011

A 'case' for action


We have been using cloth nappies with Little Imp since soon after she was born, and the elastic has now begun to go in the legs.   
That means leaking.
That means more washing.                                                                                                                                                                 One clever hootchie suggested replacing the elastic & the thrifty me thought that was a great idea….until the enthusiasm well and truly wore off and I had only re-elasticised about 6 of the 20 nappies we have. In a moment of clarity I realised I could get brand new ones off ebay for less than $5 each and sew something far more exciting with the time I’d save.  Not exactly environmentally friendly, but at the time it was justification enough for me!

I had seen some ‘pillowcase’ dresses on the internet & used the dimensions from the prudent baby blog to make my first version.  Turns out Little Imp either doesn’t fit their dimensions or has got a bit chubbier than I thought! Decided I needed to come up with my own variation of the pillowcase design.


Sunday, 24 July 2011

Freestyle

Experimenting again with some freestyle stitching in this wee singlet design.  Straight stitch around Mr Tortoise & then random twirls and circles of different coloured straight stitch over and around 3 fabric dots underneath.  Realise that ribbed material like this is not the best to use, especially as I am a bit lazy & didn't use any sort of fabric support to stop the ribbing from stretching one way & then the next.  But happy enough with the outcome overall.  Just lucky to find some time in the last week to do anything with working 4 days a week, building extensions happening around us and illness plaguing each one of us in turn.


Thursday, 14 July 2011

'Bowl'ed over

My dad is a pretty handy man when it comes to turning wood.  These pictures of some of his bowls speak for themselves me thinks.


p.s. my mum's pretty handy when it comes to turning clay.  I'll show you what I mean sometime soon.....

Monday, 11 July 2011

ideas of wood

My dad does some amazing things with wood.  As a little kid I remember the jigsaw puzzles he used to make for  my brother & I.  Now things he makes are a bit more upmarket.  Mum rolls her eyes & sighs each time he comes home with another piece of wood he has found or scavenged, his eyes bright with the planned bowl he might work from it.  Poor dad, it's not the sort of hobby you can do on the quiet.  After-all,  it is a bit hard to hide a tree stump in the boot!

I must take and upload some pictures soon of some of the pieces he has gifted to me....

Anyhow, the reason I am thinking of dad's wood collection is having come across this clever little rustic pencil holder on another blog tonight.  I might just have to ask dad for a suitable off-cut to make one myself at some point....or maybe he will do it for me??

Tuesday, 5 July 2011

Nesting?!

Not sure I believe in the 'nesting' theory of expectant mothers.  The closest I came to 'nesting' before Little Imp was born was starting to make a lamp shade and light shade for her room. The lampshade I managed to finish before her birth, the light shade only had its final touches done just before her first birthday. So much for nesting!

I've always liked little creatures, and ladybugs and bees seemed easy enough to make out of felt, so that's where I began. Lots of fiddly snipping of felt and plenty of hand stitching later the bugs and bees were all in place on the calico I had cut to size to fit the shades.  The lamp was easy to finish off - just glued the calico and then lengths of red ribbons onto the shade.  The overhead light shade was a bit trickier, needing some sewing and trimming to get a neat fit, and I really struggled to find the right shade of red tassle trim that I was after.  So that is my excuse for the bare light bulb in Little Imp's room that has probably blinded her with each nappy change until I finally finished the shade a few months ago.