Sunday, 7 October 2012

Felt Cucumber

Right, I am going to ignore the comments of some of my family members and upload this post showing my felt cucumber.

This was finished this ages ago, but certain people have insinuated that perhaps my design of this vegetable is a little phallic. Ok, perhaps I could see it too once it had been pointed out, and even more so in some of the camera angles I used to take pictures, but Little Imp doesn't have the dirty mind that some of my family do so here is my cut cucumber.


Tutorial
Instructions for one cucumber
Finished size approx 23cm long 
Materials - dark green felt (about 25x 15cm square), white felt (about 10cm square), needle, thread, stuffing, sewing machine (optional but faster!)


For the cucumber body or skin
Fold dark green felt in half lengthways.  Place pattern template with one long edge on fold as indicated.  Pin and cut out.

Open out flat and then stitch lots of straight-ish parralel-ish lines in dark green thread down the length of the cucumber skin - this will give the ridged effect you see on burpless cucumbers.  I used my sewing machine freemotion embroidery setting to stitch these lines, but you could hand stitch them too.

Felt opened out with stitched lines lengthways along skin of cucumber

Now fold in half with right sides together, pin and stitch around the seams to form a tube.

stitched cucumber before being turned right side out

Clip seams around the narrow end of the cucumber, turn right side out and then stuff all the way to the top of the tube.

To make the cut end, pips and all
If freemotion embroidering the pips onto the white felt, mark and stitch these first before cutting out the circle of felt - much easier to freemotion stitch onto a bigger piece of felt as it doesn't bunch up in the machine.

To do this, mark the circle and approximate pip position onto white felt using a water soluble marker.  Then free motion stitch.  I liked the effect of a dark green thread in the bobbin and a lighter green in the top spool as you can see both colours in the finished cucumber (default, not design, just forgetting to change the bobbin!).  When happy with the stitching cut out the white circle shape.
Top - template ready to mark onto white felt. Bottom - stitched and cut out white cucumber end.
Lastly position the white circle into the open end of the cucumber and blanket stitch it into place with white thread, adding any extra stuffing if you feel you need to just before you close it up with stitches.  And there you have it.  One innocent cucumber!!


Thursday, 4 October 2012

Felt Beans and Bean Pod

I like how these ones turned out.  The little beans you can see are removable (for now - perhaps I will stitch them in if Little Imp loses too many along the way).

Tutorial
Instructions for one bean pod with beans
Finished size approx 14cm  long and 3-4cm wide
Materials - dark green felt (about 15cm square), light or bright green felt (about 15cm square), scraps of brown wool, store bought pom pom (about 1.5cm diametre), needle, thread, stuffing, sewing machine (optional but faster!)


To make the beans
Fold a piece of light/bright green felt in half. Mark out one of each bean shape onto the doubled over felt (the picture below shows two of each shape marked out).  Do this using a water soluble fabric marker as the beans won't be turned inside - way too fiddly!


 I used my sewing machine freemotion embroidery setting to then stitch through both layers of felt to roughly outline each bean, leaving a small (approx 0.5cm) hole for stuffing.  I'm sure this would also work using hand stitching.


Then cut out each bean a few millimeters outside the stitched line.  Stuff the bean tightly and finally use a running stitch to close up the hole.  The photo below shows these steps:   
From top to bottom: roughly cut out stitched bean;  neatly cut out bean; stuffed bean; completed bean stitched up.
Here is a picture trying to demonstrate how I managed to get stuffing into the small hole in each bean using the blunt end of a closed pair of scissors (obviously I used my right hand to hold the scissors...but I needed to use my right hand at this point in time to take the photo!)

Making the bean pod
Double over a piece of dark green felt and then draw the pod template outline onto the felt.  Again, use a water soluble fabric marker to mark this line as the pod won't be turned inside out so any non-vanishing line will be visible at the end of making the pod.  Note that the line for stitching and the line for cutting are different for the left side 'A' of the bean as shown on the template.

doubled over felt with template ready for marking
 Then stitch around the red stitch line (I used my free motion embroidery foot to do this, I think you could manage with a standard foot or hand stitching).  Use the template as a guide as to where to start and stop this stitching to still allow a hole to insert the beans.  Then cut out the bean pod, a few millimeters from the stitched line & leaving a bit of a 'tail' at point 'A' by following the blue cutting line shown on the template.  (the top pod in the picture below is a bit confusing as I've taken the photo with the pod back to front with point 'A' actually on the right side)

top pod - shown back to front before being cut out.  bottom pod - neatly cut out with a 'tail ' on the left side 'A'
 Wind a piece of brown wool a few times about 0.5cm from the end of point 'A' and then tie off and cut loose ends to neaten.
top pod - piece of brown wool wound and tied around 'tail' at point 'A' . bottom pod - loose wool ends trimmed
 Now to insert the beans.  The first 'bean' I used was a small store bought pom pom stuffed down inside the pod.  This is quite difficult to get out so figuring it is there to give the pod a bean-filled shape but nothing more.
top - pom pom 'bean' before being stuffed into the pod. bottom - and then stuffed into the pod
 Then stuff the two beans you made into the pod and you are all done.


About my felt food challenge


Wednesday, 26 September 2012

Some quick kiddie T-shirts

A play date at the zoo today with 2 of Little Imp's interstate cousins.  Given I never get around to posting gifts & we hadn't seen them for a while I decided to quickly make them some t-shirts.  Given Little Imp's fascination (bordering on obsession) with 'raff's' at present, the zoo theme of the day and some spotty orange fabric found hiding in my stash, a new giraffe design seemed in order.

This is what eventuated:


Free motion embroidery around ears and 'ossicones'
Mostly the same process used making these ones as for all my other applique T-shirts.  Heat-n-Bond the cut out fabric design onto the shirt and then zigzag stitch around the main parts (neck, head and muzzle).  The ears and 'ossicones' were secured with free motion machine embroidery (even Nature Ranger me had to look up the real name for the antler/horns that a giraffe has - did you know they are the only animal in the world to have ossicones?!).  To stop the stretchy shirt material puckering I placed a small piece of thin webbing on the inside of the shirt & then stitched through this and the ears/ossicones.  Once all stitched I trimmed the webbing down with rounded edges.

Thankfully I had thought ahead for the possible tears if one certain Imp didn't have her own 'Raff', whipping up an extra one on an old shirt last night for Little Imp.  Good thinking that, she was pleased!!

Saturday, 22 September 2012

Felt Tomato


Yummy tomatoes this time around.


 Tutorial
Instructions for one tomato.
Finished size: approx 4.5cm high, 6cm wide
Materials - Red felt (about 20cm square), green felt, needle, thread, stuffing, sewing machine (optional)


Tomato 'body' - From red felt cut 4 pieces of the tomato template shape.


Take 2 pieces, place one on top of the other and stitch together down one side from one point to the other.  Then do the same with the remaining 2 pieces.  You now have two halves of what will become the whole tomato.
2 halves, both stitched down one side from one point to the other


Open up each half and then match up, right sides together.  Pin along one seam. Stitch from one point to the other. 
2 halves matched, right sides together, pinned ready to stitch


Then match the last two seams together and stitch this final seam to create a 4-piece 'ball' - remembering to leave a 2-3cm opening at one end for turning right side out and stuffing the tomato. 
Turn tomato right side out and fill with stuffing. Hand stitch the hole closed using red thread. This end will be the top of the tomato.


Tomato top or 'calyx' (the green bit!)- Using a sewing machine free motion embroider a circle about 1cm wide and then branch out from the circle to 'draw' a rough skinny armed 5-point star shape outline (about 4-5cm across) with a onto green felt.  Keep going around and over this design to build up the threads.  This will strengthen the felt and also allow it to hold its shape once it is cut out.  When you are done cut the star shape out with fairly sharp 'points' to end up with a star shape approximately 5-6cm across. If using a sewing machine it is easier to sew first & then cut.  Alternatively you could cut out the shape & then hand stitch the detail on later.  I didn't take any pictures of making the tomato tops, but used a similar process to the one I used to make the strawberry tops here

Attach the greenery to the top of the tomato, positioning it so that one of the arms of the star covers over the hand-stitching you did to close the hole used for stuffing.  Use small hand stitches to secure, but only stitch in/around the central part of the green so that you can curl the ends to make it look a bit more real.


Not entirely necessary, but I decided to also stitch a small cross along the seam lines on the base of tomato using 2 strands of a coppery coloured embroidery thread.

Now I just need a few basil leaves and I could have myself a brushetta...mmm...memories of slap up lunches in Spain.


I do also have a cucumber & some beans in pods made up but not yet blogged, and a banana that was almost my undoing!


Sunday, 16 September 2012

Little Imp's Feature Wall Finally Complete

From this:


To this:


Little Imp's Feature wall is complete!


 It has taken a while but it has been fun & I've learned a whole lot along the way.  Thank you also to others who have also added to the wall - the leaves, the dyed silk, the button bird, painted elephant and Winnie the Pooh prints. xx


Sunday, 9 September 2012

Felt Lemon

Little Imp loves pretending to make cups of 'lemin tea', so a lemon has to be included in the mix of fruit & vegies I'm making her for Christmas.


Tutorial

Instructions for one lemon.
Materials - Yellow felt (about 15cm square), scrap of green wool, needle, thread, stuffing, sewing machine

Lemon 'body' - I was right in my initial thoughts that the basic '3-piece template' that I used to make my felt apple would work for other fruit and veg & here is the same pattern used to make a lemon.


From yellow felt cut 3 pieces of the basic template shape.  


Place 2 of these pieces on top of each other & then stitch down one side from one point to the other.

Add the 3rd piece and stitch in place down one side.  Then stitch the final seam  to create a 3-piece 'ball' remembering to leave a 2-3cm opening at one point (where all the seams meet) for turning right side out & to stuff. 

Turn lemon right side out and fill with stuffing.  Then hand stitch the hole closed.  

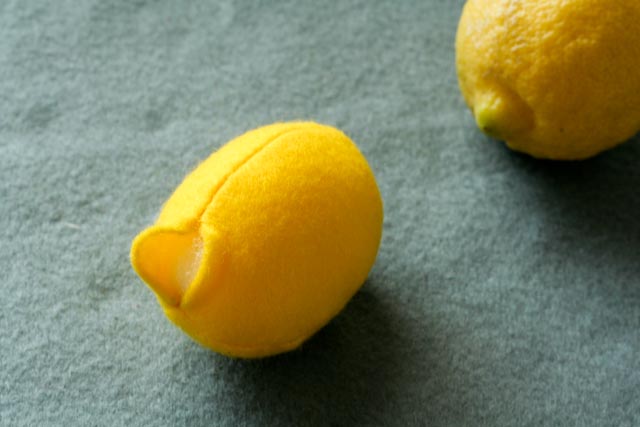
Next form the 'nobbly' bit you often find at the end of a lemon (no scientific name like 'calyx' this time!) using needle & thread.  Hand stitch a running stitch around the lemon about 1.5cm from one pointy end and then pull the thread up to gather the felt to a rounded point like you can see below.  Once happy with the amount of gathering secure off the thread with a small knot.  Then at this same end of the lemon, & using a double thread, make a few small stitches at the very point of the lemon & then take the needle & thread through all the way to the opposite point.  Pull the thread just enough to get a slight dimple at each point.  Secure with a few more stitches & cut off.


At the opposite end of the lemon add a touch of green - I tied a knot in a small piece of green wool & then cut off the ends to essentially leave just the knot.  Hand stitch this small knot in place like in the picture below


Cup of lemon tea anyone?

Sunday, 2 September 2012

Felt Carrot

Carrots anyone?  The latest felt food installment.


Tutorial
Instructions for one carrot (although some of the pictures in this entry show 2 carrots being stitched - it is much faster overall to make more than one carrot at a time).
Finished size approx 16cm long + wool leaves
Materials - orange felt (about 20cm square), green wool, needle, thread, stuffing, sewing machine (optional but faster!)


Mark out the triangle pattern shape onto the orange felt. I used my sewing machine freemotion embroidery setting to then stitch lots of straight 1cm - 3cm lines in dark orange thread randomly over the carrot but you could also hand stitch these on.
free motion sewing the lines on the carrot

Two carrots shown here with sewn lines
Now either cut out, fold right sides together & then stitch the seam to join side A to side B or,
I found it easier to get the carrot point looking better by folding, sewing first & then cutting away from the larger piece of felt (less fiddly at the pointy end I think)
sewing up the first carrot matching side A & side B & cutting once sewn together
Turn carrot right side out & stuff.
Inside out carrot on left.  Right side out carrot on right
Hand stitch a running thread around the carrot top and begin to pull this closed to gather the top.  Before it is too tight add in the leaves.

The Leaves - I used two different coloured wools to make the leaves, wrapping them around my thumb & little finger in a figure of 8 about 4 times before removing and poking one end of the wool into the carrot top.

Poke the wool into the hole at the top & then pull up the gathering thread to close the top.  Reinforce the gather with another line of stitching & stitch through the wool a few times as well to secure in place.
pull up the gathering thread to close the top
Now make a few more to get yourself a bunch of carrots!