Friday, 5 July 2013

Bungle Jungle Quilt - Red and Grey Block

Here is the next block towards making up the Bungle Jungle Floating Block Quilt for a new cousin...

 This block uses a slightly different technique from my Green & Navy Block, based (at least to start with) on Alyssa Haight Carlton's Improvisational Piecing Block of the Month. 

Red and grey improvisational pieced block

This is roughly what I did...

Just like the green & navy block, cut strips approx 2.5-2.75 inches wide off each layer cake square.

Join 3 strips together along the long edge. Here is one of the combinations I played around with ... if you do have double ups of fabric try to make sure they are in a different position in the rows (i.e. the grey /coloured spot fabric is on the outside in 2 of these combinations - would be better to have one in the middle). This just makes it easier to get more even/pleasing fabric combinations later on when you cut and re-join pieces together.

So, stitch the sets of 3 strips together....

And then wonky cut these into about 4 strips each of different widths:


Then join 3 of these little strips to make up a 3x3 mini block, and then another 3 to make another mini block..and so on, until you have 4 mini blocks. These might all be of slightly different sizes. Because I wanted a whole crocodile in the quilt I made the final block up a bit differently as you can see in the picture.

Once the 4 mini blocks are sewn up then sew 2 of these together, and then the other 2 together to end up with 2 bigger rectangles.

the 4 'mini-blocks', with the left side showing 2 of these already sewn together. 
Finally, sew the 2 rectangles together to form the final rough edged block. Later on it will get squared up, but I'm just leaving it rough around the edges for the moment.

Final 'rough' block

I'm not so sure that I like how definite this final seam joining the 2 rectangles appears compared to all the other slightly wonky lines. I've decided not to unpick just yet though, & will wait to see if I still notice it once all the other blocks are finished.

Later...
I added a row across one edge of the block - both because I wanted it a bit bigger in the end, but also, by adding this across the edge I also visually broke up the seam line I was worried about looking too 'straight'.
adding an extra row to the red and grey block

So now I have a Green & Navy Block 
& this Red & Grey Block.

Time to create the Yellow & Red....and Aqua Blocks....


Sunday, 16 June 2013

Bungle Jungle Green and Navy Block

Here goes the first strip block.

Green and Navy strip block

This is roughly what I did...

Cut a strip approx 2.5-2.75 inches wide off each layer cake square. I used a quilting ruler and mat to make sure I was getting this approximate width, but then purposefully cut the line a bit wonky alongside the ruler edge.
ruler used as a guide for width, but not to actually cut the fabric
cut fabric showing wonky-ness of the cut
 I cut 7 different fabric strips from a selection of the green fabrics with some navy and white fabrics thrown in for highlights and contrast.

cut strips overlaid to give an idea of how they will look together
The next step was to roughly cut each strip into 3 or 4 smaller rectangles, and then begin playing around to get a layout of about 5 lines to start with. This layout seemed to work as a starting point. Don't forget that once sewn the overall size will be quite a bit smaller given the number of seams.
layout before sewing strips together

Get out the sewing machine and sew the small rectangles together to form 5 strips. I still used a 1/4inch seam, but again, not too fussed if the sewn line was a little wonky or if angles weren't straight - this is what I wanted, improvising! Then press seams.
little rectangles sewn together into 5 strips
Lay out the strips on a cutting mat (not pictured) to recheck if you need to add more rectangles to each strip, or more strips to get the finished block size you are after.
I was happy with what I had, but had some skinny bits of fabrics so pieced together & added a skinny line 3 rows down.  Then the next step was to sew each strip to the next and press. Again, I purposefully stitched these rows together on a bit of an angle and with a bit of 'wonk'.

Later...After sewing up the other coloured blocks (that I will blog about later) & beginning to play around with an overall design for the quilt I decided to add another strip.
Don't do the next step until you have finished all your floating blocks & have worked out the sizes you want for each block. This picture shows measuring and lining up the quilting ruler to square up the final block.


Saturday, 15 June 2013

Bungle Jungle .. A new quilt


A new quilt!

A baby cousin for Little Imp is on the way, so there is a need for a quilt to be made.

I bought a Layer Cake, Moda Bungle Jungle, a little while back when my brother was in the US & I didn’t have to pay postage and now I get to slice and sew. Very exciting. (In case you don't know a 'layer cake' is a selection of forty 10 inch fabric squares from a single fabric collection)


Hours were spent considering different patterns until I came back to a floating block design. The tricky part with the Bungle Jungle fabric was still wanting to include some sort of Game of Same option and also keep the animals in the animal prints relatively whole so they can be recognizable, kind of like an ‘eye spy’ quilt.

The initial pattern plan is this…no doubt it will change a bit as I go, but a bit of a mud map to go by.


I divided the fabrics into four different sets of colours
aqua and navy

green with navy highlights

yellow and red
 And grey and red.

There are also squares of animal prints in each of the different colours that look something like this:

I didn't take any pics of these animal prints before I started fussy cutting these out to make what will become a bit of a matching game. Not quite the game of 'exactly the same' but a game of 'kind of the same'! Matching the same animals but with different background colours ... the downside of only having a 10inch square of each piece of fabric. You can see some of the pairs I began cutting out to start with here.


Still not sure how I am going to use the large animal print square in the quilt...time will tell....


Sunday, 17 March 2013

Nappy bag for cloth nappies, or wet bag

Hello! I'm back. Yay for me (because that means I've found time to craft again). Sure noticed a need for the creative outlet and a few weekends ago I made it back into the 'Button Room', my craft haven. It was a bit of a mess as I'd just kind of left it post Christmas creativity so there were bits everywhere. And dusty too - not good. A big spring clean & I was back in action though.

I made a kind of water / smell resistant nappy bag for Little Imp not long after she started day care. Daycare was happy to use our cloth nappies, but were sending each wet one home in a plastic nappy bag! - not really in line with the eco/cloth nappy ethos. The one feature I didn't include though at that time was a separate pocket for dry/clean nappies. So this is version 2 of my nappy or wet bag, with space for clean nappies included. A girlfriend has just had a little boy & plans to use cloth, so hopefully sh will find this useful! I now also use Little Imp's bag for swimming clothes - it will leak eventually, but still holds up pretty well.

How To:

Materials - 


  • Block out fabric (purple), 
  • Large tooth jacket type plastic zipper - the length of the long edge of the bag (mine is longer as this is what I had)
  • Plastic (I bought a $2 plastic table cloth from a Reject Store & cut that up, you could also use shower curtaining)
  • Velcro (hook & loop, about 5cm)
  • Cotton fabric for whatever you design on the front of the bag & a coordinating strip for the back


For the main bag cut 2 pieces (12 x16) inches from the blockout fabric (I'll refer to these as A & B)

and

2 pieces (13 x 17) inches (roughly) from the plastic
For the back 'dry' pocket (Piece C) cut 1 piece of the block out fabric (10 x 16) inches.

From the cotton fabric cut a strip about (2.5 x 17) inches.


To create the 'Dry' Pocket:

Position and pin the hook piece of velcro onto the wrong side of piece C, approximately 1.5 inches from the top and positioned so that it is in the centre.
Lay Piece C on top of Piece B as shown in the picture above, aligning the bottom corners and then marking where the loop velcro needs to be attached to Piece B. Pin the velcro in place.
You might also want to lightly mark the fabric using a ruler so that the velcro is nice & parallel to the edges.
Sew the velcro in place on both Piece B & C.

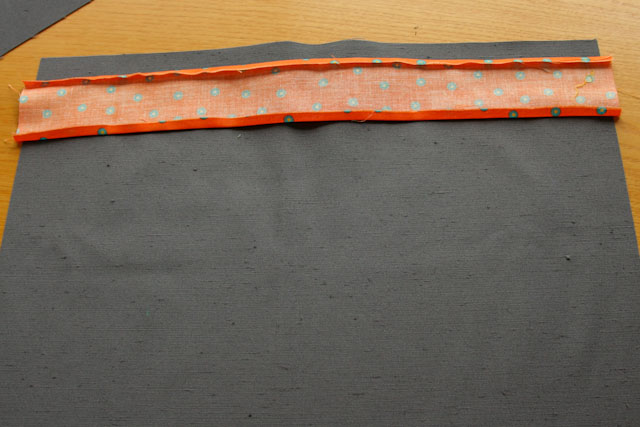
Next take the cotton fabric strip & press over approx 1/4 inch along both long ends.


Lay the cotton strip right side down. Using the crease along one of the long edges of the cotton, take Piece C, right side down, and butt the top edge (the edge with the velcro) into the crease.

You then need to make another 1/4 inch fold, this time with both the cotton and block out fabric so that the raw edge of the cotton is hidden in the seam.


The picture below shows me sewing this seam.


 And then the finished seam. I actually decided to sew another row of stitching along this seam to reinforce it (not shown).

Flip Piece C back over so it is right side up. The next step is to sew the cotton strip down, thereby hiding the stitching for the velcro). Re press the folded edge of the cotton and then flip it over to hide the velcro stitches & stitch in place.

Decorating the Front of the Bag:

Use Heat and Bond or any similar product to trace out the design you want, iron and cut out the fabric pieces and then arrange them on the front of the bag until you are happy. Iron them in place (cool iron - don't warp the block out fabric).
Then use coloured cottons to stitch the edges down (terrible photo this one, but I used small, close together zig zag edging). Now is the time to iron out any creases or add facial features etc. if you are using a fabric pen that needs ironing to set the ink (you will understand why I say this if you keep reading...)

 If you want to add a label or anything else to embellish the back, now is the time to do that too.

Adding the 'waterproof' layer'

Spread out the plastic pieces and then pin one to the wrong side of Piece A and stitch in place around all four edges - keeping close to the edge. For the back of the bag use the velcro to attache Piece B and C together and align edges and bottom corners before positioning onto the plastic, pinning and stitching all 3 layers together.
Then trim away any excess plastic.

 The back layers stitched together before trimming away excess plastic:

 Next attach the zipper to the top edge of Piece A & then Piece B. I double stitched each zipper seam to help hold the zipper in place.

Then, with the zipper open part way fold in half along the zipper, right sides together, align edges and pin. Then sew around the 3 sides, using a larger 1/2 inch seam so that you stay inside your previous seam lines. Depending on the size of your zip, you might find hand stitching the top edges easier than clunking away around the zip on your machine. (Becuase my zip was too long I also needed to cut the excess off at one end and hand stitch to secure)

Then clip edges, turn bag right side out (this is why you left the zip partly un-zipped) & you are done...unless you are then a TOTAL IDIOT like I was, and decide to set the fabric penned giraffe face using a HOT IRON. IDIOT!!!

You can guess what happened I'm sure. Table cloth melted inside the bag... stuck to itself...couldn't be pried apart...DISASTER (and a few muttered cusses/swearwords too).   Please learn from my mistake!!
I ended up having to cut out a large circle from both pieces of plastic & then managed to reline the bag without unpicking more than the second line of stitching along the zipper. Disaster averted. But pride hurt!

The Finished Product:


Tuesday, 18 December 2012

A basket full of felt fruit

I sure hope Little Imp enjoys her basket full of fruit for Christmas!


I ended up making 2 baskets that fit inside each other so Little Imp can mix and match, shop and sort to her heart's content.  One day I might get around to posting the instructions for the baskets, but for now here is a picture instead.

Here are links to all the felt fruit and veg I have made so far:

Felt apple
Felt strawberry
Felt carrot
Felt lemon
Felt lemon halves
Felt tomato
Felt cucumber
Felt beans and bean pod
Felt banana
Felt pear

Tuesday, 11 December 2012

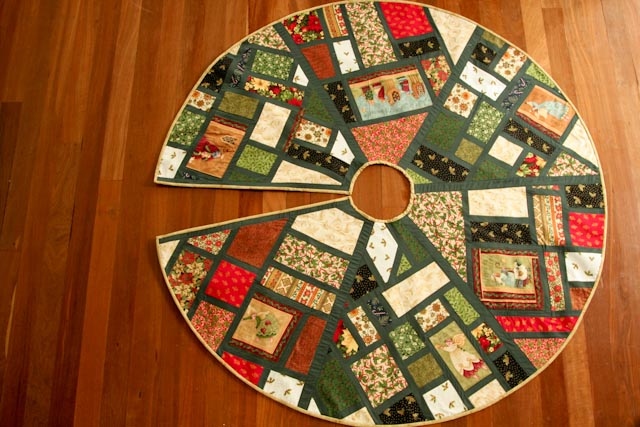
Christmas Tree Skirt

I started working on this at the beginning of the year, stopping and starting sewing in between all the other projects I've been up to and finally finished it a few months ago.


The idea came from this mod mosaic floor pillow tutorial by Elizabeth Hartman. I wanted a sort of stained glass window feel and this idea really lent itself to that.

I must admit it was a whole lot trickier than I thought, mostly I think because of trying to be a bit to stingy with the fabric scraps in each wedge and then finding that all 6 wedges didn't quite match up at the end.

I used the mod mosaic pattern idea to make up 6 wedge shapes that then joined together to form a circle.  I measured and cut a wedge template out of butchers paper to use as a rough guide to lay out each wedge.


 Then I gradually attached dark green strips around each patterned piece of fabric, cut to form straight edges and then attached the next piece of fabric or green strip and so on...  This is where, if I ever made this pattern again, I would have not been worried about probably having to cut away fabric at the end and made each wedge bigger than the template.  Much easier to cut fabric away at the end than be a few inches too short & then have to unpick and recut and restitch....believe me!

Once each of the wedges was done I attached them each together with long green strip but left an opening between 2 of the wedges as this would eventually be the opening to fit around the Christmas tree.

I ended up deciding not to do any fancy quilting for the Tree Skirt.  I found a cheap green queen sized bed skirt /valance at an op shop and used this as the underside fabric.  For the middle layer I decided to use a thickish felt.
The picture below shows the wedges connected together and then the whole circle placed on thick felt with the gold binding placed around the edge before anything being measured/cut out.

I finished the skirt like a standard quilting sandwich, pinning the 3 layers (green sheet fabric, felt and top layer) together and then quilting - straight lines along each edge of the 'spokes' or edges of the wedges and some more straight line borders around some of the feature fabric pieces within each wedge.
Then I measured and cut out the circle in the centre and measured and trimmed the outer edge before sewing on the binding.  Ta da!

Pa Rum Pum Pum Pum...


Tuesday, 4 December 2012

Armchair Recover and Applique

I've up cycled another armchair.  This time it was for my parents, so I thought I'd better not embellish it quite as much as I did for the armchair recover and applique I finished for Little Imp a while ago!

The original chair is a covered Ikea model that was faded and stained. The 'upcycling' involved making a removable cover that fits reasonably snugly over the chair, recovering the box-ish shaped cushion, and then ...because I couldn't help myself...adding on a few bits of applique.