Wednesday, 4 December 2013

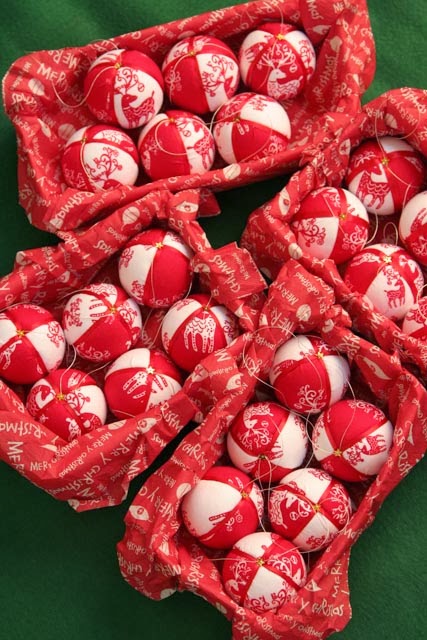
Fabric covered baubles

It isn't Christmas without festive baubles now is it!?

Here is one way of making your own fabric covered versions to pretty up the tree.

Gather your supplies:
Polystyrene balls (the ones I used were 50mm)
Coordinating fabric pieces
Matching 5mm ribbon
Scissors
Pencil & felt marker
Sharp knife to cut polystyrene
Butter knife (I used my pocket knife)
Gold stars (ones with the hole in the middle) or bead
Dressmaker pins
Elastic band that fits snugly around polystyrene ball
Template cut out of card (see pic below) – a pointy ended oval shape 9.5cm long & 5cm at the widest point (this will cover 50mm diametre balls)

Using template, mark and cut out 4 pieces of fabric for each ball. Depending on the fabric pattern you may want to position the template to get the part of the print you want. I cut 2 red print and 2 white print for each bauble.

Next you need to mark lines around the circumference of the ball to divide it into quarters. I used the circle on my mathomat to mark the points of the quarters and then slipped an elastic band over along these points to use as a guide to then mark the line. If you don’t have a mathomat you could probably just use 2 elastic bands and judge this bit by eye before marking these lines onto the ball.
 
 Using a sharp knife, cut along the lines you have drawn, about 5mm deep all the way around. Then take the first piece of fabric, place it over one of the quarters of the ball, lining it up so that it will cover all of that quarter when poked into place.

 Use a blunt edge such as a butter knife (or pocket knife tool) to begin to poke the raw edge of the fabric into the cuts in the polystyrene you made before. Starting this at the middle / widest part and working your way towards the point at each end in turn makes it easiest to keep the fabric nice and smooth. If you make a mistake, just pull out a bit and re-poke it in.

 Repeat until you have all 4 pieces of fabric poked into the ball. If you end up with excess bulk/fabric that you can’t poke in then just snip away some of the excess – make sure not to snip too much though!

 
Cover up the raw edges of the fabric using the ribbon. Start at what will be the top of the bauble and run the ribbon around one circumference line.

 When you reach the top again, twist the ribbon as shown and then track down the other circumference line – covering up all of the raw edges.


 I found it easier to pin the ribbon once it crossed over at the base, and similarly at the top to hold it in place. Snip the ribbon.


 Take a gold star (or bead) and thread it onto a pin. Tie off some gold thread and then poke the pin through the knot.


 Place this threaded pin into the top of the bauble & voila – now you can hang it on your tree...

 ....or box it up with all the others you will make as gifts!

Tuesday, 26 November 2013

An easy peasy cushion cover

I'm still alive, still crafting!
Was about to upload a post last month when I realised with a rude shock that I had gone WAY over my internet usage for the month - oops. So been offline for a while....but that has maybe meant more spare time spent in the ButtonRoom:)

Anyway, back online now and have loads to share!

Life before going to Thailand in October was hectic enough, but in the few weeks before we left I suddenly realised I definitely needed to make a padded laptop case for my laptop that was coming with us, and a travel pillow for OneLittleImp. Oh, and I also had someone contact me via my blog asking if I could make one of the giraffe t-shirts she had seen on my blog for her daughter's birthday . What a lovely surprise that was - and even a bit funny when I realised she lived all the way in Texas! So now I have sold my first item through my blog....exciting stuff!

So of course I fitted all of this craft in between packing and writing lists and cleaning the house so it would be nice to come home to (that does make such a difference to post holiday blues!)  and packing some more.

First up is the easy peasy cushion cover. This takes almost no time at all to make. No buttons, or velcro or anything! Promise.


First up, measure your cushion, add 1.5 inches as allowance on each side & then cut your front piece of fabric (the owl print in this case) to this size. For the back you will need to cut 2 pieces, both the same width as the front. To work out the length, divide the width measurement in half and then add 3 inches (so if the width was 14 inches - 14 divided by 2 = 7.  7+3=10, so you would cut 2 pieces of the backing fabric 14 inches wide x 10 inches long). This will mean that you end up with the back pieces overlapping by about 3 inches.

Fold over 1cm or so along the width of each back piece, iron & then fold over & iron again to get a nice neat edge.

Stitch along the length of this nice neat edge to secure and create a 'finished' edge. I used a fancy wavy stitch, but a straight or zigzag stitch would work just as well.

Next, place the front of the cushion cover right side up. Lay one piece of the back fabric right side down, raw edges lined up with the front piece raw edges & the 'finished' edge positioned as shown. Pin the bottom edge of the front and back pieces together.

Then lay the other piece of 'back' fabric right side down onto the front fabric and overlapping the first piece of backing fabric. Match up all the raw edges again and make sure that the 'finished' edge you sewed earlier should sit as shown in the picture. Pin all the way around to hold all the layers together.

Now sew all the way around all 4 edges of the cushion cover using a straight stitch. I then also zig zag stitched all the way around to reinforce & prevent fraying.
 Clip the corners & then turn your cushion cover right side out. Iron if you need to & hey presto - you are done! All that is left to do is stuff in the cushion.


Nothing fancy, but it sure did the trick as a comfy travel comforter during our trip:)

Wednesday, 28 August 2013

Bungle Jungle Quilt - The finale!

The finished quilted quilt!
Front and Back.


My machine handles straight line quilting very well, without any special presser foot - I just adjust the settings slightly - and so I'm a bit hesitant to try anything else...maybe next time!

And now some close ups for good measure...(after a VERY long IT support call this afternoon I can now finally upload photos from my camera to my new computer - DON'T get me started on Windows 8 - needless to say, I do not like!).
So here they are...


 Just a quick few shots of the quilting and binding process:


That's Little Imp's foot there - busy making her own blue polka dot quilt for her toy animals. She has also tested the planned 'game of same' that I will eventually make to use with the quilt - but figure I have a while before the baby will be up to matching and memory games!

Right, now onto the next project:)


Bungle Jungle Quilt outline
Red and Grey Block
Green and Navy Block
Aqua and Navy Block
Red and Yellow Block
Bungle Jungle Quilt Back

Friday, 23 August 2013

Bungle Jungle Quilt - the back

Here's the back of the Bungle Jungle Floating Blocks quilt:


The design of the back was in part driven by the realisation that I had underestimated the amount of dark grey background fabric I might need and the discovery I had a piece of perfectly bright yellow drill that could make up the difference I needed.  Excellent! This worked in well with my decision in ordering some more of the yellow polkadot fabric to use as the binding. I did look in the fabric stores here, but there really was nothing that worked, so American on line fabric purchase it had to be:(

I wanted to use the whole 10x10 inch square of the large animal print on the back, so decided to 'frame' & highlight this & then used off cuts - different shaped rectangles to break up the rest of the yellow. Something like this:


I added a yellow strip to each side of the off cuts:

Framed the large print square in dark grey, and then added yellow to the width I was after:

And then began adding solid yellow strips inbetween to make up the full length I needed. As usual, I underestimated how much I would lose in seams and ended up having to add in another few coloured rectangle to make up the full length I needed.

 Finally, once all the pieces were stitched together, I squared up the edges and stitched each long edge to a piece of grey. Done!


Then my least favourite bit...the quilting sandwich...


Wednesday, 14 August 2013

Bungle Jungle Quilt - piecing the top

A bit of maths required for this next step. "Measure 6 times, cut once". Allow yourself extra fabric allowance & it will be even less likley that you will need to cut more than once...

Once finished, one of my favorite bits - hanging this type of quilt & looking into the stained-glass-quilt-window.


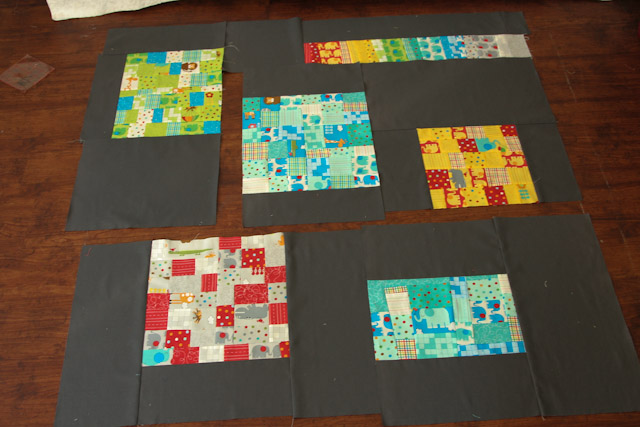
I played around for a long while with the layout, moving the finished blocks back and forth... but ended up with pretty much what I had mapped out on paper all those months ago. Then I worked out where the my dividing lines would go to make up the big blocks - it worked out that there would be 6 big blocks - worked out all the measurements on paper, allowing a good couple of inches leeway all around and then measured (6 times!) & cut out all the pieces of background grey fabric.

Given how large the blocks are I did find pinning worked well at times to make sure they remained aligned when sewing pieces together.

Here are the finished 6 blocks, with an idea how I then combined some of these together in the next round of sewing seams to get 3 blocks. 


Here is the measured & trimmed down view of the next stage - the big top & bottom rectangle blocks finished & ready to sew together.

Da da!


Thursday, 8 August 2013

Hoggie the Hedgehog


Isn't he cute?!

This is not an original - it is from this website. Very quick to piece together. I think my friend who is a bit of a hedgehog fanatic will be appreciative of this little toy for her baby when it arrives early next year.

I think my Hoggie's prickles are a bit denser than the pattern as I ended up cutting another long row of prickle fleece. Perfect for little baby fingers to grab and explore.  I also added a little jingle bell inside the stuffing for extra sensory fun!


Tuesday, 16 July 2013

Bungle Jungle Quilt - Red and Yellow Block

All there is for the Red and Yellow block is a finished shot - I was short on time and just wanted to whip this one out, so no pictures along the way.


I used the same technique for this block as for the Green and Navy Block - strips rather than blocks.

It is all beginning to come together....I just hope the finished product is going to work after the mistake I may have made....

I went searching for the background fabric last weekend, and really wasn't finding anything I liked. I had in my head that a charcoalish grey would work, but none of the greys were dark enough from the quilting cotton section. And then I found what I thought was a perfect grey in the Broadcloth section, so after a bit more umming and ahhing that is what I bought. It wasn't until I checked the receipt on my way out that I realised I had gone and bought cotton drill! Ooops. Wasn't sure if drill was acceptable for a quilt - & an internet search didn't really help. But I figure quilts in the past were made with whatever people cold find, & surely that meant fabrics would have been different weights at times?

The drill definitely is a bit heavier than the quilting fabric, and one side of has a definite diagonal weave, so if the fabric is cut and then re-oriented 90 degrees you can notice a different sheen (see pic), but the flip side doesn't have this weave line, so I think it will be ok if I make sure that is the 'right' side throughout. The plan for the finished quilt is to have a reasonable amount of quilting too, so I think any difference in fabric weight shouldn't matter once I've quilted it all together. Here's hoping anyway!
cut out background fabric - different sheen noticeable dependent on fabric orientation


Bungle Jungle Quilt outline
Red and Grey Block
Green and Navy Block
Aqua and Navy Block